How to Raise Mealworms?
How to Raise Mealworms? Raising Mealworms are considered some of the best feeder insects for birds, fish, chicken, rodents, reptiles, and other pet animals. In recent years, demand for mealworms has been on the rise. Even though there are companies at the moment producing the worms commercially, we still have many pet owners who would prefer raising mealworms on their own.
Continue read this article for How to Raise Mealworms to save your money and learn more what are mealworms.
Raising mealworms is a great idea. It allows you to control all the necessary conditions and make sure that the final product is of high quality. After all, there is no knowing how the mealworms you buy off the shelves are raised. They could contain additional substances that may be harmful to your pets. But raising mealworms is not that easy. It’s something that requires a lot of commitment and dedication. In this post, we are going to show you how to raise mealworms on your own and the kind of upkeep to give them for the best results.
Preparation for How to Raise Mealworms
Raising mealworms will require a special kind of setup. There are a few supplies you will need to get first.
Here is the full list:
- Dry oatmeal, you may also use cornmeal if you want
- An organic source of moisture that doesn’t mold quickly will also be needed. We prefer using fruits. A carrot, in particular, is very effective but other fruits and veggies should work. Sliced potatoes and apples are also perfect.
- Don’t forget to get at least three medium-sized plastic containers. They must all have air holes drilled at the top.
- Several bits of cardboard are crucial in this project. You don’t need to buy anything though. Egg cartons or used toilet paper rolls should work out just fine.
- Finally, you will obviously need some mealworms since you can’t grow them out of thin air. You can start with as little as 500 or even 1,000 depending on your needs. Live mealworms can be purchased locally or online.
Once these supplies are ready, it’s time to build up the entire setup. Start by pouring in the oatmeal or the cornmeal into the bottom of each plastic container. The oatmeal needs to fill at least 2.5 centimeters from the bottom. This will serve as the bedding and the food source for the worms as they develop through various stages.
Once the oats are in place, drop the vegetables in each bin. Although you can use any veggies as the source of moisture, we often recommend carrots, chopped potatoes, or apples. This is because these fruits and vegetables can easily deliver the required moisture for a long time without any need for regular replacement. However, if you decide to use other moisture sources, make sure you inspect them regularly for mold and replace them if needed.
How to Raise Mealworms: Pouring the Mealworms
After the moisture source is in place it’s now time to introduce the worms into the setup. For the mealworms one at a time in one of the three containers. Some farmers may decide to add a few slices of bread, some dog food, or even ground cereal as they pour in the worms. There is nothing wrong with this but it’s not entirely necessary.
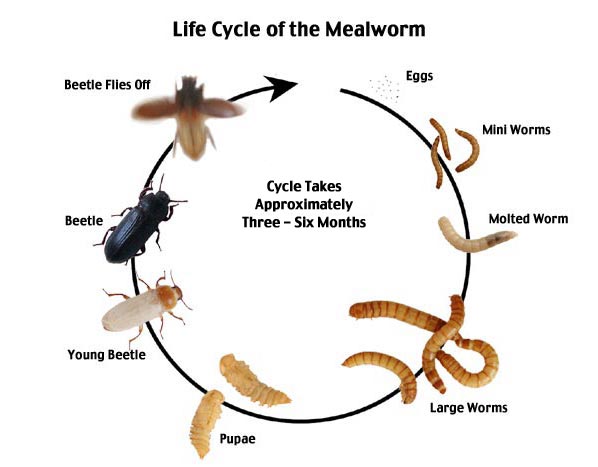
As soon as the worms are inside the plastic containers, place the cardboard material on top of the oats. The cardboard material is actually designed to prevent light from entering the containers. These little worms love the darkness and they will operate optimally under dark conditions. Label the containers if you need too and place them in a warm and dark area. One of the containers will be used for worms, the other for pupae, and the final one will be for the grown-up beetles.
Warmth helps to speed up the life cycle. This means that the worms may pupate faster under warm conditions. The intention is often to raise the meal worms until they become grown beetles. After all, in order to get a constant supply of mealworms, you will definitely need some grown beetles.
How to Raising Mealworms: Tips for Effective Upkeep How to Grow Mealworms
Upkeep is probably the most crucial and also the hardest part for people who want to know how to grow mealworms. It will require most of your time and attention. When the mealworms are tucked away in a dark and warm place, it can be easy to ignore them. But if you want the best results, you have to keep an eye on the containers and make sure all the right conditions are in place.
Upkeep is essential in raising high-quality worms and here are a few tips to keep in mind:
- Check on the Containers Regularly
The frequency used to check out the containers is determined by several factors. Some farmers do it daily and others on a weekly basis. However, a week should not pass by before checking. Make sure you remove any rotten veggies, dead worms or insects, and mold from the oatmeal substrate. Keep adding the veggies and oatmeal too. As we have noted above, the veggies and fruits are the main sources of moisture. At some point, they may start to attract mold. You shouldn’t let this happen. As for the oatmeal, they are obviously the food and after some time the quantity will go down as the worms gouge themselves. Replacing them every now and then ensures that proper growth for the worms is maintained.
- Keep an Eye for the Pupa
The mealworms that you just bought to raise are simply beetles on their larval stage. Naturally, they will progress through their normal lifestyle until they become fully grown beetles. The worms will, therefore, transform to pupa in a few weeks. However, this will not happen at once. Each worm will transform in its own time. You will need to remove the pupa from the worms and place them in a different container. Matured pupae are characterized by a number of factors. First, they have a gradual darkening color. The shape will also change. The pupa tends to look like little curled-up beetles and they will be clearly discernable from the other worms. The pupae need to be separated from the worms for a number of reasons.
First, the pupa will not eat away the moisture source and the food that you have placed inside the plastic containers. They will more likely eat up the other worms. This will reduce the number of mealworms that grow until hatching. Don’t also forget to check on the pupae once you have transferred them to the second container. Just like the larvae, the pupae develop into full-grown beetles at different stages.
The beetles too will need to be separated from the pupa and placed into their own container. This should actually be done immediately. If the beetles are left with the other pupae they will start to feed on them right away. You cannot afford to take any risk. In that case, the container that has the pupae needs to be checked and inspected daily.
- Check for Eggs
As you continue to separate full-grown beetles from the pupa, you will end up with one container that contains these insects. As part of their normal production cycle, they will start to produce eggs. The more beetles you have in the container, the more eggs you will get. The eggs are normally found at the bottom of the container. Please note that it’s not necessary to remove the eggs from the container. The eggs simply tell you that in a few weeks you will be getting some mealworms so that you can start to prepare for the transfer.
Adult females can lay up to 500 eggs at a time. The eggs will hatch within 4 to 19 days depending on the temperature. However, it is advisable to keep an eye regularly as they hatch. Once this happens, harvest the mealworms and transfer them back to the original container that had the initial set of worms in the first place. This is probably the most labor-intensive part of how to raise mealworms.
This is because an adult female beetle will lay hundreds of eggs. As we have noted above, this number can even hit 500. If you have a number of beetles in your plastic containers, you may end up with tens of thousands of mealworms eggs that hatch day after day. Harvesting the worms and transferring them back to the right container will require a lot of work. Nonetheless, if you want to grow your own worms, you have no choice. This is the kind of routine you will need to keep up with for some time.

How to Raise Mealworms
How to Raise Mealworms: Why Raise Your Own Mealworms
From the simple steps above, it is clear that raising mealworms requires some work. It’s not something anyone can do and you will need to make up the time for the upkeep. So, why would you even consider it?
Here are a few reasons why:
- Regular Supply of Meal Worms
If you have multiple pets that need a regular supply of mealworms, raising them on your own is perhaps the easiest way to make sure the treats are available all the time. You can of course order online but it takes days before the shipments arrive. Most people don’t like waiting for that long. With your own mealworm farm, you can simply harvest the worms anytime you need to and let your pets enjoy the treat.
- It’s Less Costly for how to raise mealworms by your self
Buying mealworms right out of the shelves will cost you some money. People with more than one pet will need to spend even more. But with your own farm, the cost is quite low. In fact, you don’t need to invest a lot to get started. With the exception of the worms and probably the plastic containers, all the other supplies needed to set up a mealworm farm can be easily sourced from home. This ensures that you end up saving so much on the overall costs of feeding these tasty and healthy worms to your pets.
- It’s Really Fun for how to raise mealworms at home
If you have the time, raise your own mealworms can be a very fun-filled activity. There is nothing more beautiful than watching the worms come to life and eventually transform into fully grown beetles. This is the kind of thing that you look forward too and it can bring a very strong sense of fulfillment.
- It’s Not That Hard for raising mealworms
You don’t need a lot to start raising your own mealworms other than time. The only challenge here is labor. But if you can find a way to give the worms the attention they need, the rest is pretty easy. From the mealworms raising setup, upkeep, and harvesting, everything about how to raise mealworms is self-explanatory and as such, it’s fair to say that anyone with enough time can do it. Besides, mealworms are odorless and don’t require a lot of space. They can literally be raised anywhere in the house discreetly and no one will even notice they are there.
- You Will Get 100% Natural Products
Many pet owners are always very careful with the kind of food they feed mealworms to bluebirds and their pets. In recent years, the idea of getting 100% natural non-GMO feeds has become very popular. Although many sellers online claim that their products meet these standards, it’s not that easy to know for sure. But raise your own mealworms gives you that surety. The worms coming out of your colony will be raised under your own preferred conditions. This gives you a piece of mind knowing that the worms are 100% natural.
Getting a regular supply of natural mealworms for your pets online is a great idea no doubt. But in order to really benefit from these insects, you will have to go through various providers and determine which ones are trustworthy. If you don’t want to go through all this hustle, then you can start raising mealworms on your own. The simple steps above should get you started. Raising mealworm is a low-cost, fun, and safe way of delivering natural worms to your pets. It’s definitely something worth trying.
Any questions about how to raise mealworms? Leave your comment here!!!


These beetles sometime lland on our terraces at night. Can we use them for breeding ?
Hi C B Sunwar, I suppose your beetles on the terraces are different, if they are from the mealworms, then you can breeding.
Great article Franck!
Another option why to breed mealworms could be also a human consumption. There are many startups emerging in this industry lately. Check e.g. ww.entoway.com
Hi Josip, thank you for your comment!